Showing posts with label Mobile Knowledge. Show all posts

Monday, January 9, 2017

ASUS Raw Firmware Collection (All Fine)


 Image result for asus phone

ASUS Flashtool ကေန Flash ဖုိ႕ Raw File Firmware ေတြပါ။
100%  All Fine. :)

Password ခံထားပါသည္။ လုိအပ္ပါက 09770116630 သို႕ဆက္သြယ္ပါ။


Model List 

A450CG
A502CG
A600CG
FE170CG
FE380CG
ME175CG 
ZC451CG
ZE550ML

Saturday, December 10, 2016

Bricked Qualcomm Firmware Update Tool

 No automatic alt text available.

Bricked Qualcomm Firmware Update Tool
===================================
ခုေနာက္ပိုင္း အျဖစ္မ်ားေနတဲ့ Huawei , Xia့omi , ZTE Devices ေတြမွာ
Dead Boot ျဖစ္ေနတာေတြ Image Signature Fail error တက္တာေတြ
Firmware တင္ျပီး လို ့ Pass ျဖစ္တာေတာင္ logo က မတက္တာေတြ
(Xiaomi)
အာ့လို error ေတြ ျဖစ္ေနတယ္ဆို လွ်င္ မိမိ Devices ကို 9008 mode
၀င္ၾကည့္ပါ 9008 mode ၀င္လို ့ရတယ္ဆို ရင္ေတာ့ Firmware ျပန္တင္လို ့
ရႏိုင္ပါတယ္....
9008 mode ကေန Firmware ျပန္ေရးလို ့ရတဲ့ Tool ေတြ ေတာ္ေတာ္မ်ား
မ်ား ရွိပါတယ္ အာ့ထဲက မွ Tool Stuido ကို အသံုးျပဳျပီးေတာ့ Firmware
ျပန္တင္နည္းေလးပါ
========
QDLoader_HS-USB_Driver.7z, Size 13.12 MB...
http://d-h.st/x86D
https://userscloud.com/hwca0ou7m3tx
https://usersfiles.com/2t32wroevmpx
=============
===========
ToolStudio.zip, Size 56.36 MB...
http://d-h.st/vo21
https://userscloud.com/ge33lhnxs1es pass=susutun
=================
(1) Driver Install လုပ္ပါ
(2) ToolStudio ကို zip ျဖည္ျပီးေတာ့ ToolStudio_4.6.exe ကို
Run as administrator နဲ႔ဖြင့္ပါ (Double Click ႏွင့္ ဖြင့္လို ့မရ)
ပြင့္လာလွ်င္ ဒီ password ကို ရိုက္ထည့္ေပးပါ bason998@sina.con
ျပီးလွ်င္ဖုန္းကို 9008 mode ၀င္ျပီးေတာ့ ေအာက္က ပံုေလး ေတြ အတိုင္း
အဆင့္ဆင့္ လုပ္ေဆာင္ေပးပါ


No automatic alt text available. 

No automatic alt text available. 
 
No automatic alt text available.

Wednesday, November 9, 2016

Visual Basic အားအသံုးျပဳျပီး Android Tool တစ္ခုေရးသားျခင္း

Microsoft Visual Basic ေလ့လာမယ့္သူေတြအတြက္ XDA က Post တစ္ခုကုိ
ဘာသာျပန္ေရးသားထားပါတယ္။

Project တစ္ခုစတင္တည္ေဆာက္ျခင္း

Visual Studio ကုိဖြင့္ပါ။ ေအာက္ကလုိ Welcome Page ေပၚလာပါမယ္။


'New Project...' ကုိေရြးပါ။
ေအာက္ကလုိေပၚလာပါမယ္။


 'Windows Forms Application' ကိုေရြးျပီးႏွစ္သက္ရာနာမည္ေပးလုိက္ပါ။
ဒီမွာေတာ့  Android One-Click Tutorial လုိ႕ပဲေပးထားပါတယ္။

အားလံုးျပီးတာနဲ႕ OK ကုိႏွိပ္ျပီး Project အသစ္တည္ေဆာက္လုိက္ပါ။


One-Click adb tool ေလးေရးၾကည့္ပါမယ္။

Project စတင္ျပီဆုိတာနဲ႕ ေအာက္ကလိုေပၚလာပါမယ္။ Version ေပၚမူတည္ျပီး ပံုစံအနည္းငယ္ကြာျခားမႈ
ရွိပါမယ္။


Form ေပၚကုိ ျမွားခ်လုိက္တာနဲ႕ ၾကိဳက္ရာ Form Name ကုိေရးေပးပါ။
ဒီမွာေတာ့ Project Name နဲ႕ တူေအာင္ Android One-Click Tutorial လုိ႕ပဲေပးထားပါတယ္။
Form ကုိ လုိသလုိ အက်ဥ္းအက်ယ္ ခ်ဲ႕ျပီး ေအာက္ကလုိ ပံုေလးျဖစ္ေအာင္ထားလုိက္ပါ။


ျပီးရင္ေတာ့ Program Run လုိ႕အဆင္ေျပမေျပ စမ္းၾကည့္ပါ။ F5 ကုိႏွိပ္ျပီး


အဆင္ေျပရင္ေတာ့ ADB ဖုိင္ေလးေတြထည့္ပါမယ္။
ADB Bundle ကုိ ဒီမွာေဒါင္းပါ


ေဒါင္းလုိ႕ရတာေတြကုိ Computer ရဲ႕ documents folder ထဲမွာထားလုိက္ပါ။
'adb.exe', 'AdbWinApi.dll', 'AdbWinUsbApi.dll' and 'fastboot.exe' ဖုိင္ေလးဖုိင္ကုိသံုးမွာပါ
ဖိုင္ေလးဖုိင္ပါတာစံုတယ္ဆုိ  Visual Studio ရဲ႕ Project properties ကုိဝင္ပါ။  (Project ->> <Project Name> properties)  'Resources' ကိုေရြးပါ။ String format ျဖစ္ေနပါလိမ့္မယ္။ files ကုိေျပာင္းေပးပါ။


အေပၚက adb file ေလးခုကုိ add ေပးပါ။ ေအာက္ကလုိမ်ိဳးပါ။


အားလံုးျပီးသြားရင္ coding ပုိင္းစေရးလို႕ရပါျပီ။


Form ေပၚကုိ Double Click ႏွိပ္လုိက္ရင္ coding tab ေပၚလာပါမယ္ ။ အေပၚဆံုးမွာ ေအာက္က
Code ကိုျဖည့္ပါ။

Code:
Imports System.IO
Imports System.Threading
Imports System.Windows.Forms.DialogResult

adb file ေတြကုိ Copy ယူဖုိ႕ Coding ေတြထည့္ပါမယ္။

ေအာက္မွာေပးထားသလုိျဖည့္ေပးပါ။
Code:
If Not Directory.Exists("ADB") Then
            Directory.CreateDirectory("ADB")
        Else
            If Not File.Exists("ADB\adb.exe") Then
                File.WriteAllBytes("ADB\adb.exe", My.Resources.adb)
            End If
            If Not File.Exists("ADB\AdbWinApi.dll") Then
                File.WriteAllBytes("ADB\AdbWinApi.dll", My.Resources.AdbWinApi)
            End If
            If Not File.Exists("ADB\AdbWinUsbApi.dll") Then
                File.WriteAllBytes("ADB\AdbWinUsbApi.dll", My.Resources.AdbWinUsbApi)
            End If
            If Not File.Exists("ADB\fastboot.exe") Then
                File.WriteAllBytes("ADB\fastboot.exe", My.Resources.fastboot)
            End If
        End If
အေပၚကေပးထားတဲ့ Code ေတြျဖည့္တဲ့အခါ အခုျပထားသလုိျဖစ္ေနရပါမယ္။


ေနာက္တစ္ဆင့္သြားပါမယ္။


ခလုတ္ေလးခုထည့္ပါမယ္။ေအာက္ကလုိ နာမည္ေပးပါ။

  • Back up the device
  • Restore the device
  • Install an app
  • Push a file
Adding Buttons and Commands:
Move back to the designer and add a few buttons like I've done. The buttons I've created will: Now, we want to create four more forms. One for the backup, one for the restore, one for the install app and one for pushing a file. Hit CTRL+SHIFT+A to add new items. You can name the forms however you want. I created some with pretty self-explaining names: Now, double-click on each button in Form1 to create a new code block in the code file. Once you have done that, copy the following codes into each code block. Button1_ClickButton2_ClickButton3_ClickButton4_Click Now open up the Backup form. We'll start here. You can close the Form1-files. Start designing the form as you wish. Here's how I've done it: If you're using the same design as me, you might want to use the same code. This is working code. I have debugged and tested!Once you have that done, move to the next form. This, in my case, is Restore. To keep the thread clear, I'll carry on in post #2.


Code:
Backup.Show()
Me.Hide()

Code:
Restore.Show()
Me.Hide()

Code:
Install.Show()
Me.Hide()

Code:
Push.Show()
Me.Hide()


NOTE: I rarely use the .Net components in the Toolbox. Only for static operations. For things like dialog boxes, I use pure code.
Code:
Imports System.IO
Public Class Backup

    Private Sub Backup_Load(sender As Object, e As EventArgs) Handles MyBase.Load
        TextBox2.Text = "Backup_From_" & Date.Now.ToShortTimeString
        If Not Directory.Exists(TextBox1.Text) Then
            Directory.CreateDirectory(TextBox1.Text)
        End If
    End Sub

    Private Sub Backup_FormClosing(sender As Object, e As EventArgs) Handles MyBase.FormClosing
        Form1.Show()
    End Sub

    Private Sub Button1_Click(sender As Object, e As EventArgs) Handles Button1.Click
        Dim FolderBrowse As New FolderBrowserDialog
        FolderBrowse.Description = "Select the destination of where you wish your backup to be saved to." _
            & "Note: Please do not choose locations with spaces in the directories. These may cause errors!"
        FolderBrowse.ShowNewFolderButton = True
        Dim DialogRes As DialogResult = FolderBrowse.ShowDialog
        If DialogRes = Windows.Forms.DialogResult.OK Then
            TextBox1.Text = FolderBrowse.SelectedPath
        End If
    End Sub

    Private Sub Button2_Click(sender As Object, e As EventArgs) Handles Button2.Click
        Shell("""ADB\adb.exe"" backup -f" & TextBox1.Text & "\" & TextBox2.Text & "-apk -system -full -all", AppWinStyle.NormalFocus, True, 30000)
    End Sub
End Class


Ok, now let's get on with Restore.

Open up the file, and again, design it as you want.
If you're using the same design as me, it is advisory, that you use the same code.


Here is the code I used:
Code:
Private Sub Button1_Click(sender As Object, e As EventArgs) Handles Button1.Click
        Dim OpenFile As New OpenFileDialog
        OpenFile.InitialDirectory = My.Computer.FileSystem.SpecialDirectories.Desktop
        OpenFile.Multiselect = False
        OpenFile.Filter = "AB (Android Backups)|*.ab"
        OpenFile.SupportMultiDottedExtensions = False
        OpenFile.Title = "Select the Android Backup (*.ab) file to restore your device from..."
        Dim DialogRes As DialogResult = OpenFile.ShowDialog()
        If DialogRes = Windows.Forms.DialogResult.OK Then
            TextBox1.Text = OpenFile.FileName
        End If
    End Sub

    Private Sub Button2_Click(sender As Object, e As EventArgs) Handles Button2.Click
        Shell("""ADB\adb.exe"" restore " & TextBox1.Text, AppWinStyle.NormalFocus, True, 30000)
    End Sub

    Private Sub Restore_FormClosing(sender As Object, e As EventArgs) Handles MyBase.FormClosing
        Form1.Show()
    End Sub
And now we're ready to move to the third form. As usual; if you're using the same design as me, you'll want to use the same code as me.
I'd like to note: I'll explain all the code in post #3.

The third form (Install an App) will be a bit different than the others. Here, we'll give the user the opportunity to select an entire folder which contains .apk files and then with a mouse-click, the app will install the desired APK.


Note the ListBox, That is where all the APKs will be listed. (Hence the name 'ListBox'.)

I have pulled some APKs from my phone and have put them in a folder (C:\APKs). We will use this folder to list all the available APKs in the listbox.
But before we do that, here is the code for the form. Again, nothing is imported here.
Code:
Private Sub Install_FormClosing(sender As Object, e As EventArgs) Handles MyBase.FormClosing
        Form1.Show()
    End Sub

    Private Sub Button1_Click(sender As Object, e As EventArgs) Handles Button1.Click
        Dim FolderBrowse As New FolderBrowserDialog
        FolderBrowse.Description = "Select the folder containing your APK files."
        FolderBrowse.RootFolder = Environment.SpecialFolder.DesktopDirectory
        FolderBrowse.ShowNewFolderButton = False
        Dim DialogRes As DialogResult = FolderBrowse.ShowDialog()
        If DialogRes = Windows.Forms.DialogResult.OK Then
            For Each Item As String In My.Computer.FileSystem.GetFiles(FolderBrowse.SelectedPath)
                ListBox1.Items.Add(Item)
            Next
        End If
    End Sub

    Private Sub ListBox1_SelectedIndexChanged(sender As Object, e As EventArgs) Handles ListBox1.SelectedIndexChanged
        Shell("""ADB\adb.exe"" install " & ListBox1.SelectedItem.ToString, AppWinStyle.NormalFocus, True, 30000)
    End Sub
And here are some pictures of the code in action:

FolderBrowserDialog (FolderBrowse):


The list of apps (ListBox):


Ok. We're almost done with our One-Click utility!

We've only got one more form and we'll do that in a dash! Then I'll get to explaining what everything means. Though most of it is pretty much self-explanatory, I'd rather go over it.

Move on to the last form, and the same rules apply.

This form will be using the same method as the Install form - Using a ListBox to display files.


Here is the code:
Code:
Private Sub Push_FormClosing(sender As Object, e As EventArgs) Handles MyBase.FormClosing
        Form1.Show()
    End Sub

    Private Sub Button1_Click(sender As Object, e As EventArgs) Handles Button1.Click
        Dim FolderBrowse As New FolderBrowserDialog
        FolderBrowse.Description = "Select the folder containing the file/s you want to push to the device..."
        FolderBrowse.ShowNewFolderButton = False
        FolderBrowse.RootFolder = Environment.SpecialFolder.DesktopDirectory
        Dim DialogRes As DialogResult = FolderBrowse.ShowDialog()
        If DialogRes = Windows.Forms.DialogResult.OK Then
            For Each Item As String In My.Computer.FileSystem.GetFiles(FolderBrowse.SelectedPath)
                ListBox1.Items.Add(Item)
            Next
        End If
    End Sub

    Private Sub ListBox1_SelectedIndexChanged(sender As Object, e As EventArgs) Handles ListBox1.SelectedIndexChanged
        Shell("""ADB\adb.exe"" push " & ListBox1.SelectedItem & " " & TextBox1.Text, AppWinStyle.NormalFocus, True, 30000)
    End Sub
Cool! We've got our first One-Click-Utility done in Visual Basic.Net! This is pretty awesome, don't you think? I may have to re-do this thread, but for the moment it'll do, I guess.

Move down to the third post, to read all about what what piece of code does.

Tuesday, November 8, 2016

Samsung Myanmar Font Installer


 Samsung ဖုန္းေတြ ေနာက္ပိုင္းမွာ Font Style ေျပာင္းမရတာေတြအတြက္
Root ေဖာက္ျပီး Official font ထည့္သြင္းေပးမယ့္ app ေလးပါ။

ေအာက္က Link မွာ ရယူပါ။

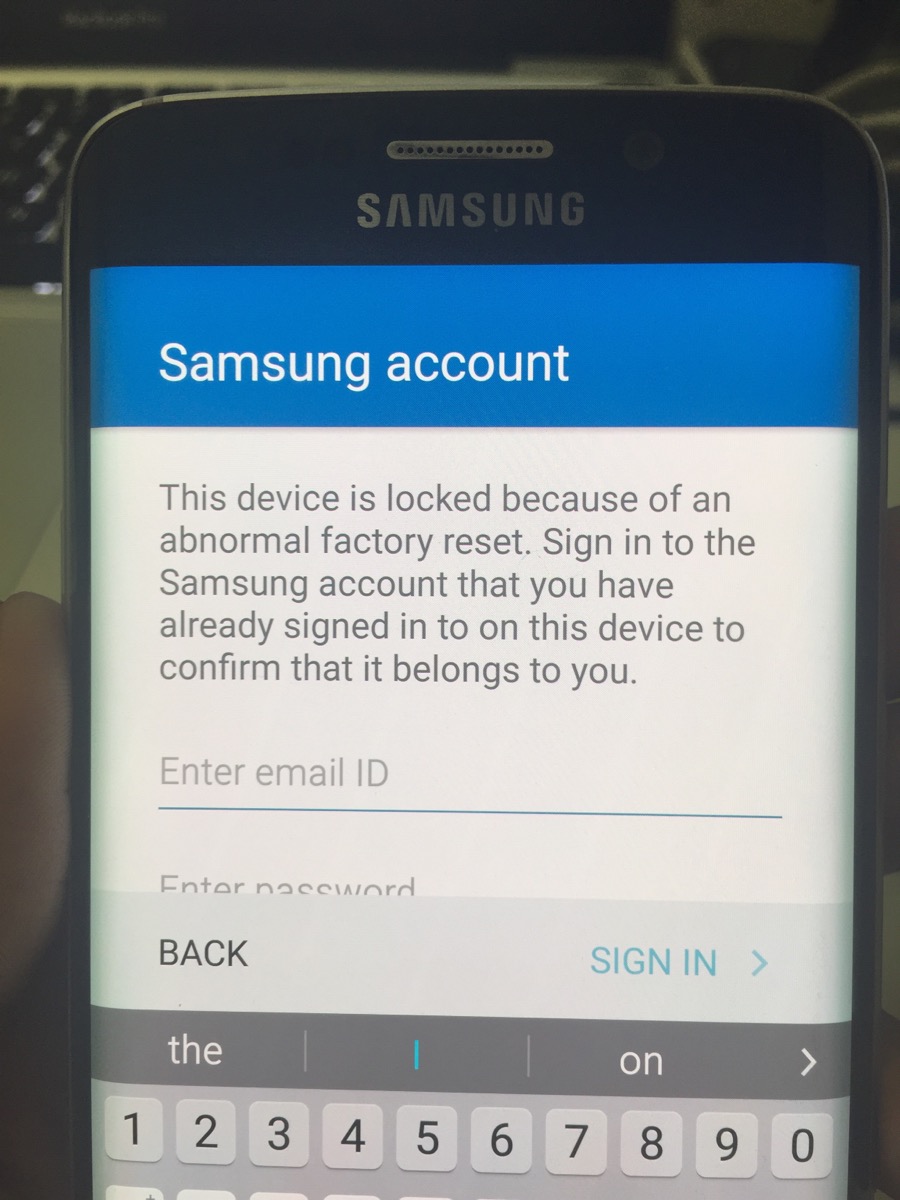
Samsaung account ID Locked ျဖတ္နည္း (100%) done ... No ..box, No .. OTG.cable,NO ..bypass.Apk


Image result for Samsung Account lock 

 ##..samsaung account မရိွပါက ဖြင့္ပါ။(using any mail)
##..internet connection (wifii) လိုသည္။
၁။samsaung account ID ေတာင္းေသာ page သို.ေရာက္ပါက..back keyကို တစ္ခ်က္ျခင္း ႏိွပ္၍ Wekcome. Page သို ့ျပန္သြားပါ။
၂။first page သို႔ေရာက္ပါက Accessibility Setting ထဲသို႔ဝင္ပါ။Accessibility ထဲမွ voice ထဲသို႔ဝင္ပါ။ voice ထဲရိွေအာက္ဆံုးမွ text to speech option ကိုႏိွပ္ပါ။ ဒုတိယ စာေၾကာင္းကိုေရြးပါ။
၃။Google text ရိွ setting တြင္.install voice data ကိုေရြးပါ။
၄။Google TTS Voice data ေဘး႐ွိ option ကိုႏိွပ္ပါ..View open sources lincenc ကိုႏိွပ္ပါ။
၅။Notices for page ေပၚလာလွ်င္..phone screen ကို ဖိထား၍ႀကိဳက္ရာ စာကို copyလုပ္ပါ..အေပၚ ညာေထာင့္ရိွ search ကိုနိပ္ပါ။
၆။Get google Now ေပၚလာမည္။ ေအာက္တြင္ ညာဘက္ရိွ tap ကို ႏိွပ္ပါ။just a second. ေပၚမည္။ Add your account တြင္ gmail(သို႔)ႀကိဳက္ရာ mail ထည့္ပါ..password. ထည့္ပါ..
၇။Google Service က်လာမည္ Next ကိုႏွိပ္ပါ။Get Google Now က်လာလ်ွင္ အေပၚ႐ွိ search box တြင္ dog , car, စာလံုး ႐ိုက္၍ search ကိုႏွိပ္ပါ။ Web page က်လာလ်ွင္ တစ္ခုခု ထဲသို႔ ဝင္ပါ။ Chome ႏွင့္ default browser. ေပၚလ်ွင္ default browser ကို ေရြးပါ..
၈။webpage က်လာလ်ွင္ browser ၏အေပၚညာဘက္ရိွ option ကိုႏိွပ္ပါ။option ထဲရိွ setting ထဲသို႔သြားပါ... Setting ထဲ႐ိွ Manage Account ကို ေရြးပါ..OK ကို ႏိွပ္ပါ။ေအာက္ဆံုးမွစာေၾကာင္းကိုေရြးပါ..။
၉။Singin ကိုႏိွပ္၍ samsaumg account ကိုထည့္ပါ..။ရက္စဲြတုိုက္ပါ။ ျဖည့္သင့္သည္မ်ားျဖည့္ပါ။
ေအာက္ဆံုးရိွ check box တြင္အမွန္ျခစ္ျဖဳတ္၍Next ကို ႏိွပ္ပါ။
၁၀။ i agreed to all ကို အမွန္ျခစ္ပါ .Next ကို ႏိွပ္ပါ။ Welcome ေပၚလ်ွင္ Comfim ကို ႏိွပ္ပါ..ခဏေစာင့္ပါ။
၁၀။ အားလံုးၿပီးပါက back key ျဖင့္ တစ္ခ်က္ျခင္းႏိွပ္၍ first page သို႔ ျပန္သြားပါ။ တစ္ဆင့္ျခင္းျပန္ဝင္ပါ..samsaung account ေတာင္းေသာ page သို႔ ေရာက္လ်ွင္ samsaung account username ႏွင့္ password ကို ထည့္၍ Sing in လုပ္ပါ..Ok ကို ႏိွပ္ပါ... ခဏ ေစာင့္ၿပီးရင္ ရပါၿပီ....

Monday, November 7, 2016

X-Bo X14 DeadBoot & Display error Fix Firmware


Image result for XBo  android X14 


X-BO X14 ကုိ Firmware တင္ရင္း Dead သြားတာလား???
ဒါမွမဟုတ္ Display Error တက္သြားတာလား???
ဒီလုိျဖစ္ခဲ့ရင္ေတာ့ အခုေပးထာတဲ့ေကာင္ေလးတင္ေပးလုိက္ပါ။
အဆင္ေျပသြားပါလိမ့္မယ္။
Download Link >>>
Password ခံထားပါသည္။

http://www.mediafire.com/…/2zc…/XBO+Deadboot+%26+LCD+FIX.zip

Emate Tool

Image result for Emate tool

Emate Tool ဆုိတဲ့ Emmc Bin ဖုိင္ကုိျပန္ေရးတဲ့ Tool ေလး Share ေပးလုိက္ပါတယ္
ေအာက္မွာ Download ရယူပါ။

Emate Box နွင့္ျဖစ္ေစ Qualcomm MMC Storage မွ emmc bin ဖုိင္ေရးပါ


Friday, November 4, 2016

Device Driver အေၾကာင္း


ကြန္ပ်ဴတာ အသံုးအနွဳန္းတြင္  Driver ဆိုသည္မွာ ကြန္ပ်ဴတာတစ္လံုးကို ခ်ိတ္ဆက္ထားေသာ Devices မ်ားကို ထိန္းခ်ဳပ္ႏိုင္သည့္ Program ျဖစ္သည္။ ဥပမာ Printer Driver , Graphic Driver , Wifi Adapter Driver စသည္ျဖင့္ Driver ေပါင္းမ်ားစြာရွိသည္။ Printer ႏွင့္ ခ်ိတ္ဆက္အသံုးျပဳမည္ဆိုလွ်င္ Printer Driver လိုအပ္ၿပီး Wifi အသံုးျပဳလိုလွ်င္ Wifi Driver လိုအပ္သည္။ ပံုမွန္အားျဖင့္ Driver အမ်ားစုကို Operating System (OS) ထဲတြင္ ထည့္သြင္းေပးထားၿပီးျဖစ္ေသာ္လည္း အသစ္ထြက္ Device မ်ားအတြက္ Driver မ်ားကိုမူ အျပင္မွ ကိုယ္တိုင္ Install လုပ္ေပးရမည္ျဖစ္သည္။
Driver File မ်ား ၏ Extension မွာ .inf (setup information file ) ျဖစ္သည္။
(Figure.1)

အထက္ပါပံုတြင္ .inf ျဖင့္ဆံုးေသာ (.inf   Extension ပါေသာ ) android_winusb.inf ဖိုင္သည္ Driver ဖိုင္ျဖစ္သည္။


Driver File (.inf) ကို Install လုပ္ျခင္း

Device Driver File (.inf) မ်ားကို Install လုပ္ရန္ နည္းလမ္းမ်ားစြာရွိပါတယ္။အဆင္ေျပေသာ နည္းကို သံုးၿပီး Install လုပ္ႏိုင္ပါတယ္။

Method (1)
Install လုပ္လိုေသာ Driver File  (.inf) ေပၚတြင္ Right Click ႏွိပ္ပါ။ Install ကို ေရြးၿပီး Install လုပ္ပါ ။

(Figure.2)

Method (2)
အခ်ိဳ႕ Driver မ်ားသည္ Internet မွ Download ခ်ရာတြင္ Installer Program ပါ တစ္ပါတည္းပါလာတတ္သည္။ ထိုသို႔ေသာ Driver မ်ားကို မူ အတူပါလာေသာ Installer Program (.exe) file ကို Right Click ႏွိပ္ၿပီး Run As Administrator ျဖင့္ Run ၿပီး Install လုပ္ႏိုင္သည္။
(Figure.3)

Driver မ်ားကို Install လုပ္ရတြင္္ (ဒီ Driver ရဲ့ ထုတ္လုပ္သူကို မသိပါ ) ဟု Warnning စာမ်ား တက္လာတတ္သည္ ။ Install This Driver Software Anyway ကို ေရြးေပးရပါမယ္။ ေအာက္ကပံုတြင္ၾကည့္ပါ ။
(Figure.4)
Method (3)
Install Program လဲ မပါ  Right Click + Install ျဖင့္လည္း Install လုပ္လို႔မရေသာ Driver File (.inf) မ်ားရွိပါသည္။ ထိုသို႔ေသာ Driver မ်ားကို Command ျဖင့္ Install လုပ္လို႔ရပါတယ္။
Driver File (.inf) ပါေသာ Folder ကို Desktop ေပၚလို႔ Copy ကူးပါ ။ Desktop ေပၚေရႊ႕ထားေသာ Driver Folder ထဲဝင္ပါ ။ အေပၚက address bar ကို Right click ႏွိပ္ၿပီး Copy Address ကို ေရြးေပးပါ။

(Figure.5)

Window Key ကို တစ္ခ်က္ႏွိပ္ၿပီး cmd ဟုရိုက္ပါ . cmd.exe ကို Right Click > Run As Administrator ျဖင့္ Run ပါ ။
(Figure.6)

cmd window ထဲတြင္  cd   လို႔ရိုက္ပါ ။ space bar တစ္ခ်က္ႏွိပ္ပါ ။ right click ကုိ ႏွိပ္ၿပီး paste ကို ေရြးေပးပါ ။ ၿပီးရင္ Enter ကို ႏွိပ္ပါ ။
(Figure.7)

(Figure.8)
Enter ႏွိပ္ၿပီးလွ်င္ ေအာက္ပါ command ကုိ အတိအက် ေရးပါ ။ Install လုပ္ေနလိမ့္မည္။
pnputil      -i      -a     *.inf
(Figure.9)


Install လုပ္သည့္ Process ၿပီးသြားလွ်င္ Install လုပ္ခဲ့သည့္ Driver File အေရအတြက္ႏွင့္ ေအာင္ေအာင္ျမင္ျမင္ ထည့္ႏိုင္သည့္ Driver အေရအတြက္ကိုေဖာ္ၿပေပးလိမ့္မည္။
(Figure.10)


Method (4)
Device Manager မွ Install လုပ္ျခင္း
ကြန္ပ်ဴတာမွ Device Manager ကိုဖြင့္ပါ .Device Manager ကိုဖြင့္ရန္ နည္းလမ္းေတြအမ်ားၾကီးရွိပါတယ္ . အဆင္ေျပရာႏွင့္ဖြင့္ပါ . ကၽြန္ေတာ္နည္းလမ္းတစ္ခုေရးျပပါမယ္ ။
-My Computer ကို Right Click ႏွိပ္ၿပီး Manager ကို ေရြးပါ ။
-Computer Management Window ေပၚလာလွ်င္ Device Manager ကိုေရြးပါ ။

  • Device Manager ကိုဖြင့္ၿပီးသြားလွ်င္ Driver Install လုပ္လိုေသာ Device ကို Right Click ႏွိပ္ပါ ။Update Driver Software ကိုေရြးပါ။ (ကၽြန္ေတာ္ Android Adapter ADB Interface နဲ႔ ဥပမာ ျပပါမယ္ ။)

-Internet မွ တိုက္ရိုက္ Install လုပ္လိုလွ်င္ Search automatically for updated driver software ကိုေရြးပါ .
-ကြန္ပ်ဴတာထဲမွာ ရွိၿပီးသား Driver file (.inf)ကို Install လုပ္လိုလွ်င္ Browse My Computer For Driver Software ကိုေရြးပါ ။
အခုကြန္ပ်ဴတာထဲမွာ ရွိၿပီးသား ကို Install လုပ္မွာျဖစ္လို႔ ေအာက္က Browse My Computer ကိုေရြးလိုက္ပါမယ္.

-Let me pick from a list of device drivers on my computer ကိုေရြးပါ ။

-Have Disk ကိုႏွိပ္ပါ ။
-Browse ကို ႏွိပ္ပါ ။
-သြင္းလိုတဲ့ Driver File (.inf) ကိုေရြးေပးၿပီး Open ကိုႏွိပ္ပါ ။
-OK ကိုႏွိပ္ပါ .

Driver file (.inf) ထဲတြင္ပါေသာ Driver အမ်ိဳးအစားမ်ားေရြးခိုင္းလိမ့္မည္ .

ဒီေနရာမွာ ကိုယ့္ဖုန္းက ဘယ္အေျခအေန မွာ ခ်ိတ္ထားတာလဲ သိရပါမယ္ ။ ပံုကို ၾကည့္ပါ ။
ကၽြန္ေတာ့ဖုန္းက Normal Mode , Adb Mode မွာ ခ်ိတ္ထားတာျဖစ္လို႔ Android ADB Inerface ကိုေရြးၿပီး Next ကို ႏွိပ္လိုက္ပါမယ္ ။ Warning စာ တက္လာပါတယ္ ။ လုပ္မွာလား မလုပ္ဘူးလားဆို လုပ္မယ္ YES ကို ေရြးေပးလိုက္ပါ ။
Install လုပ္ေနပါတယ္ ။

Install လုပ္တာ ေအာင္ျမင္ပါၿပီ ။

  • Window 64Bit ေတြမွာ Driver Install လုပ္ရင္ Signature (catalog) မပါတဲ့ Driver ေတြကို Install လုပ္လို႔မရပါဘူး ။ ဥပမာ . MTK VCOM Driver , Qualcomm Driver , SPD VCOM Driver
  • Install လုပ္ခ်င္ရင္ ကြန္ပ်ဴတာရဲ့ Device Signature Check ကို Disable အရင္လုပ္ၿပီးမွ Install လုပ္ရပါတယ္ ။

(ပံုႏွင့္တကြ ၾကည့္လိုလွ်င္ pdf ကို ေဒါင္းၾကည့္ပါ )

Download Here

Tuesday, September 6, 2016

Huawei Qualcomm Theme / Noti Bar Error Fixer ( One Click )


Huawei Qualcomm ဖုန္းေတြမွာ Board Firmware ေရးလို႕ Noti Bar ေပ်ာက္တာ
Theme Change လုိ႕မရတာေတြအတြက္ 1 Click Fixer ေလးပါ။ လုိအပ္သူမ်ားေအာက္က
Link မွာ Download ရယူပါ။ Password က thethtwe ပါ။

Tuesday, August 23, 2016

Redmi Note 3 IMEI Error and Baseband Unknown [ Root မလို 100% Safe Method ]

ပထမဦးဆုံး လိုအပ္ေသာ Software မ်ားကို Download ခ်ထားရန္လိုအပ္ပါသည္။
 
MauiMETA 3G ေလးကို install ျပလုပ္ထားပါ။ထို႔အျပင္ IMEI.zip ဖိုင္ေလးကိုလည္း ျဖည္ထားေပးပါ။
MauiMETA 3G ေလးကိုဖြင့္ထားလိုက္ပါ။
အထက္ဆံုး ၃ ေၾကာင္းကို အမွန္ျခစ္ေပးလိုက္ၿပီးေနာက္ Reconnect ကိုႏွိပ္ေပးပါ။
မိမိဖုန္းကိုပိတ္လိုက္ပါ။ထို႔ေနာက္ Volume Upကိုဖိႏွိပ္ၿပီးေတာ့ဖုန္းႏွင့္ကြန္ပ်ဴတာကို ခ်ိတ္ဆက္လိုက္ပါ။Device Manager ကိုဖြင့္ထားပါ။
Driver မသိတာတစ္ခုတက္လာပါလိမ့္မည္။
အဲဒီမသိေသာ Driver ေလးကို IMEI Folder ထဲမြ Android_Gadget_CDC_driver.inf ဖိုင္ကို ညႊန္းဆိုျခင္းျဖင့္ Driver သိနိုင္ပါသည္။ Driver သိသြားလၽွင္ COM Port ေနရာတြင္ ေပၚပါလိမ့္မည္။

ထို႔ေနာက္ MauiMETA 3G က Driver သိေတာင္အလုပ္မလုပ္ပါက မိမိဖုန္းကို Volume Up+ Volume Down + Power ႏွိပ္ကာ မိမိဖုန္းကို Force Close လုပ္ပါ။ထို႔ေနာက္ Volume Up ကိုဖိၿပီးႀကိဳးျပန္ထိုးေပးပါ။
IMEI Download ကိုေရြးလိုက္ပါ။
Change NVRAM Database File ကိုႏွိပ္ၿပီးေတာ့ IMEI Folder ထဲမွ BPLGUInfoCustomAppSrcP_MT6795…………ႏွင့္စေသာ ဖိုင္ႏွစ္ခုအနက္မွမိမိစိတ္ႀကိဳက္ တစ္ဖိုင္ကိုေရြးေပးပါ။

NVRAM database File Successfully ျဖစ္သြားပါလိမ့္မည္။ထို႔ေနာက္ IMEI ေနရာတြင္ မိမိစိတ္ႀကိဳက္ ဂဏန္း ၁၄ လုံးရိုက္ထည့္ၿပီး Download To Flash ကိုႏွိပ္ေပးပါ။

Download IMEI tol Flash Successfully ျဖစ္သြားရင္ရပါၿပီ။Sim 2 တြင္လည္းအထက္ပါအတိုင္းလုပ္ေဆာင္လိုက္ပါ။အားလုံးၿပီးသြားရင္ေတာ့ စက္ကိုဖြင့္လိုက္ရင္ေတာ့ Redmi Note 3 ေလး IMEI ေလးေတြေပၚေနမွာ အေသအခ်ာပါ။

Friday, August 12, 2016

Huawei MTK Mobile Brick Restoration Tool

Image result for Huawei Brick Restoration tool 

Soft Brick ျဖစ္သြားတဲ့ MTK Huawei ဖုန္းအခ်ိဳ႕အတြက္ Restoration flashtool ပါ။

Support ေပးတဲ့ Model ေတြကေတာ့ 

Supported Models


H30-T00


H30-T10


H30-U10


G750-T00


G730-T00


G730-U00


G610-T11


G610-U00


G610-T00


G520-5000


G520-T10


G700-T00


G700-U00
 
Tool ကုိ ေအာက္က Link မွာရယူႏူိင္ပါတယ္။ 


Honor 6 Android အတြက္ MiniFlashtool


Image result for HONOR 6 mini flashtool 

  • Unlock/Relock Bootloader.
  • Flash CWM/Stock Recovery.
  • Rooting (with Sideload).
  • Unbrick from bootloop.

ေဖာ္ျပပါအခ်က္မ်ားနဲ႕ အသံုးျပဳလုိ႕ရမယ့္ Tool ေလးပါ။ ေအာက္က Link မွာ Down ယူပါ။

Tuesday, August 9, 2016

Partition ေတြကုိ Edit,Resize ျပန္လုပ္ဖုိ႕ Scatter Editor Tool


MTK Chipset Firmware ေတြရဲ႕ Partition ေတြကုိျပန္ျပဳျပင္လုိ႕ရတဲ့ Tool ေလးပါ။
 ေအာက္က Link မွာ Version ႏွစ္မ်ိဳးနဲ႕ Down ယူႏူိင္ပါတယ္။


Monday, August 8, 2016

Xiaomi ဖုန္းမ်ားအတြက္ ROM Finder Android Application


Xiaomi Android ဖုန္းမ်ားအတြက္ ROM Name ရွာတဲ့အခါ အခက္အခဲျဖစ္ေနသူမ်ားအတြက္
ROM Finder Android application ပါ။ ဘာ Function ေတြပါလာမလဲဆိုရင္...

  • Cover ေနာက္ဖုန္းရဲ႕ နံပါတ္နဲ႕ Model ကုိတုိက္ရုိက္စစ္ႏူိင္ပါမယ္။
  • ကုိယ္ Download လုိခ်င္တဲ့ Model ေပၚကုိ Long Click ႏွိပ္တာနဲ႕ Link Generate ျဖစ္ျပီး Download Link Copy ကူးျပီးသားျဖစ္သြားပါမယ္။
  • Fastboot ကေနၾကည့္လုိ႕ရမယ့္ ဖုန္းေတြအတြက္လည္း Fastboot ROM Code Name ေတြပါစစ္ႏူိင္ပါတယ္။
  • Download Link ေတြကုိလည္း Model အလုိက္ Official ယူေပးသြားမွာျဖစ္ပါတယ္။

ေအာက္က Link မွာ Download ရယူပါ။

Sunday, August 7, 2016

ဖုန္းဆားဗစ္သမားေတြအတြက္အရမ္းအစြမ္းထက္တဲ့ MRT Dongle

မုိဘုိင္းဆားဗစ္ Technician ေတြအတြက္ ဖုန္းေတြကုိဆားဗစ္လုပ္ဖုိ႕ေဆာင္ထားသင့္တဲ့ Dongle တစ္ခုပါပဲ။ MRT Dongle ရဲ႕လုပ္ေဆာင္နုိင္စြမ္းေလးေတြနဲ႕ လုိအပ္တဲ့ Tool ၊ အသုံးျပဳနည္းတစ္ခ်ို႕ကုိေဖာ္ျပေပးလုိက္ရပါတယ္။
MRT Dongle ရဲ႕လုပ္ေဆာင္ႏိုင္တာေတြကေတာ့
-Mi Phone မ်ား Mi account unlock ျပဳလုပ္ျခင္း၊ FRP Unlock ျပဳလုပ္ျခင္း၊ Phone Pateen and Password remove ျပဳလုပ္ျခင္း၊ Mi fastboot မွ Firmware တင္ျခင္း၊ 9008 Mode သို႔၀င္ျခင္း၊ Qcn Read and Write ျပဳလုပ္ရန္အတြက္ Modem ComPorts Open ျပဳလုပ္ျခင္း၊ System, Cache, Userdata image (ext3, ext4) မ်ားကို Unpack and Repack ျပဳလုပ္ျခင္း၊ Modem Fix ျခင္း
-MeiZu Phone မ်ား Flyme account Remove ျပဳလုပ္ျခင္းမ်ား၊ Imei Repair
-New MTK CPU model မ်ားျဖစ္ေသာ  MT6752, MT6753, MT6595, MT6795 ……..
-Old MTK CPU model မ်ားျဖစ္ေသာ MT6571, 6572,6577,6582,………etc
တို႔ကို readback ျပဳလုပ္ျခင္း၊ firmware flashing ျပဳလုပ္ျခင္း၊ Read information, Format, Clear FRP< Unlock Password, Imei repair,…..တို႔ကိုျပဳလုပ္နိုင္ျခင္း (Using with MRT MTK software)
-EMMC Box မ်ားနွင့္ တြဲစပ္၍ EMMC Data read and Write ျပဳလုပ္ႏိုင္ျခင္း၊ တို႔ကိုလုပ္ေဆာင္ႏိုင္စြမ္းရွိသည္။

MRT Dongle ေတြက တစ္ခုကုိ ျမန္မာေငြ တစ္သိန္းသုံးေသာင္း၀န္းက်င္ရွိပါတယ္။ MRT Dongle ေဆာ့၀ဲကုိကြန္ပ်ဴတာမွာအသုံးျပဳေတာ့မယ္ဆုိရင္ MRT Dongle ကုိကြန္ပ်ဴတာမွာတပ္ထားရမွာပါ။
ကြန္ပ်ဴတာမွာသုံးရမယ့္ MRT Dongle Tool ကို ရယူဖို႕အတြက္ေတာ့ ေအာက္ပါ Link မွာ ၀င္ေရာက္ Download ျပဳလုပ္ႏိုင္မွာပါ။
Download
Download လုပ္လို႔ရလာတဲ့ File ထဲကမွ MRT.exe ေလးကို run ေပးရမွာျဖစ္ပါတယ္။
1
Tool ဟာ Dongle ကို Detect သိေနမွ tool ဟာပြင့္လာမွာျဖစ္ၿပီးေတာ့ တကယ္လို႔မ်ား Dongle ကို detect မသိဘူးဆိုရင္ tool ဟာ ခ်က္ျခင္းျပန္ပိတ္သြားမွာျဖစ္ပါတယ္။
ေအာက္ကပံုကေတာ့ Karbonn Titanium MachOne Plus IMEI ကိုျပန္ေရးျပထားတာျဖစ္ပါတယ္။
2
Mi Phone ေတြအတြက္ လိုတဲ့ Setup ကိုေတာ့ ေအာက္ပါ Link မွာ Download ရယူႏိုင္ပါတယ္။
Download
3
Meizu Tool ကိုေတာ့ ေအာက္ပါ Link မွာရယူနိုင္ပါတယ္။
Download
3
ကုိယ္တုိင္လည္းေလ့လာၾကည့္ပါ။ မွ်ေ၀ပါ။ MRT Dongle နဲ႕ပတ္သက္တဲ့ Tutorial ေတြကိုလည္း ေနာက္ပိုင္းအလ်ဥ္းသင့္သလို တင္ေပးသြားပါ့မယ္။

From : Myanmarmobileapp

Samsung Full Firmwaere Maker

Image result for Samsung Firmware

Samsung Firmware file တစ္ဖုိင္တည္းျဖစ္ေနျပီးတင္လုိ႕အဆင္မေျပတဲ့အခါ
ေလးဖုိင္ျပန္ခြဲေပးမယ့္ tool ေလးပါ။ ဖုန္းအားလံုးမွာေတာ့မရပါဘူး။ 
အသံုးျပဳဖုိ႕ေအာက္က Link မွာ Download ယူပါ။